
Repair, Don't Replace Old Windows

Nothing gives character to an old house like original windows. The wavy glass and divided-light patterns are unique to the structure and the era when it was built. But just because your windows sag or won’t open, don’t give up on them. Often the damage is superficial and easily fixed. Before you ruin the character of your old house or risk lucrative tax credits with replacement windows from the local home improvement store, read on. The following window restoration tips can help preserve one of the most important architectural features of your historic house.
Window restoration expert Dixon Kerr advises:
Starting with Sashes
Unless it’s a minor problem -such as reglazing-remove the sash. Access the bottom sash by cutting the paint line where the window stop meets the frame. Use a small pry bar backed by a stiff-bladed putty knife to pop the stop, and then cut the old sash cords to lift out the bottom sash.
Removing the parting bead that divides the top and bottom sashes is tricky. Try a painter’s 5-in1 to pry them apart. Or clamp the face of the bead in a Vise-Grip locking sheet metal tool (Irwin, 800-464-7946, www.irwin.com) and yank it out.
Most top sashes are painted shut, but meant to be operable. Separate the paint seal with a sharp utility knife. If you’re having trouble, check for hidden screws or nails.
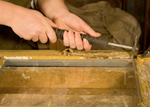
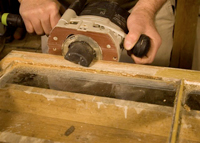
Fixing Jams
Remove paint from the inside running surfaces of the window frame. A Speedheater (703-476-6222, www.eco-strip.com) works well. It uses infrared light to soften paint at a lower temperature than conventional heat guns.
Remove paint from metal pulleys by soaking in a 1-to-1 mixture of Simple Green and ammonia. Rinse them with water after several days.
Check every surface of the window jambs for rot with a painter’s 5-in-1. If you find any, treat it with an epoxy repair system (System Three Resins, 800-333-5514, www.systemthree.com). Cover the empty jamb with insulating foam board or plywood.
Strip the sash down to bare wood, then sand, prime, paint and reglaze.
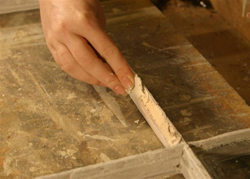
Glazing is key
Clean old glass. Liberally coat liquid glass cleaner over glass, and then run a safety razor over its surface before polishing with a cloth.
Use the Speedheater to soften up the glazing at the same time as the paint removal. Protect the glass from rapid heating/cooling which could make it crack. Cover it with a scrap of hardboard wrapped in aluminum foil. After exposing a 14-inch section to the heat for about 60-90 seconds, slide the unit down the rail and scrape away the loosened paint and glazing compound. Use an Eco-Strip chisel with an attached wheel to remove the glazing compound without damaging the glass.
Once the glazing is out, carefully remove the glazier’s points with a small pair of needle-nose pliers. Properly priming the sash requires you remove all the old glass panes. Work around any old glass too stubborn to remove.

If you break old glass, look for replacements at architectural salvage stores (Caravati’s, 804-232-4175, www.caravatis.com). Some manufacturers make reproductions: Bendheim (www.bendheim.com) and Artisan Glass Works (www.artisanglassworks.com)
Repair minor rot with an epoxy wood repair system. After allowing the epoxy to cure (typically overnight) lightly sand all surfaces with 100-grit sandpaper.

Apply a generous coat of Benjamin Moore’s Fresh Start-an alkyd primer suitable for both interior and exterior uses-to all surfaces except the vertical edges. Fully coat the part that holds the glass because the glazing compound will not bond well to bare wood.
After the primer dries, spread a thin frosting of glazing compound on the part that holds the glass. Gently press the glass into place. Use triangular glazier’s points to secure the glass. With a putty knife, push the points into the wood just far enough for them to be covered by the new putty. For small panes of glass (as in 6-over-6 windows) one point in the middle of each mullion will do. On larger panes, leave about 12 inches between points.
Clean the glass one last time before applying the glazing compound. Apply a coat of NoStreek Glass Polish (GetCloss, www.gel-gloss.com).

IMPORTANT: Go with a professional-grade glazing compound like Perm-E-Lastic Glazing (Atlas Putty Products, 800-373-2727, www.putty.com). Tool the compound with a curved putty knife (Ro-Don, 800-829-0687, www.ro-don.com) when working in corners.
Dust fingers with plaster of Paris to prevent fingers from sticking. Starting at a corner and holding a ball of putty in one hand, tear off thumb-sized chunks and press them roughly in place. When one side is fully loaded, place the clean knife blade in a corner an hold it at an angle steep enough to ensure that the edge of the putty won’t be visible from the other side. Using pressure from forefinger to hold the knife blade tight to the edge, draw the blade smoothly from one side to the other.
After trimming away excess putty, roll it back into the ball and move on to another section. Set aside to cure for a few days.
Put a second coat of primer on the exterior faces and follow that with a coat of paint.

Energy Efficiency
Try silicone beads and nylon pyle (brush-type) weather seals. They snap into narrow grooves routed into surfaces of the sash. Old windows may be made energy efficient by nylon pyle weather stripping on the exterior faces of the sash, where a seal will be made against the parting bead and with tubular silicone across the meeting rail and at the top and bottom of the sash. Adding storm windows is always recommended as it will protect your work.
Restringing Sashes
Make top and bottom sashes operable. You’ll appreciate the air flow. Begin by opening the covers that allow access to the weight boxes and cut the old cord from the sash weights. If the weights are missing, weigh the sash with a hand-held fishing scale, then divide by two to determine the correct replacement size.
Fish the new cord through the pulley by attaching it to a 5-ft length of string with a lead fishing weight on the end.

Loop the cord through the hole in the weight and tie it with two half-hitches, leaving a few inches of slack pointing upward. To prevent any future snags, crimp the loose end back onto the cord using a hot ring. Pull the cords as high as they’ll go and secure them with a spring clamp. Placing each sash in turn at the bottom of the jamb, cut the cord about an inch below the knot mortise in the edge of the sash and tie it in a simple overhand loop. When both sides are done, remove the clamps and operate the sash to make sure it enjoys full range of motion.
Secure each to cord to the sash with two copper roofing nails: one through the knot; the other about 2 inches above the first.
Before fastening the cords to the lower sash, temporarily remove so you can replace the box covers and the parting bead.
Secure the parting bead with 1.5 inch hardwood trim nails (Maze nails, 800-435-5949, www.mazenails.com) spaces about 24 inches apart. Cover any noticeable gap between the bead and the frame with light bead of caulk.

Replace the stops after you make sure any paint on inner edges has been removed.
Hold each one snugly against the bottom sash and tack it with the same nails used for the parting bead.
After all the stops are in place, rub a block of paraffin wax along the channels of the window frame to lubricate.
Your windows should operate as smoothly as any modern unit - and look much better.

Nothing gives character to an old house like original windows. The wavy glass and divided-light patterns are unique to the structure and the era when it was built. But just because your windows sag or won’t open, don’t give up on them. Often the damage is superficial and easily fixed. Before you ruin the character of your old house or risk lucrative tax credits with replacement windows from the local home improvement store, read on. The following window restoration tips can help preserve one of the most important architectural features of your historic house.
Window restoration expert Dixon Kerr advises:
Starting with Sashes
Unless it’s a minor problem -such as reglazing-remove the sash. Access the bottom sash by cutting the paint line where the window stop meets the frame. Use a small pry bar backed by a stiff-bladed putty knife to pop the stop, and then cut the old sash cords to lift out the bottom sash.
Removing the parting bead that divides the top and bottom sashes is tricky. Try a painter’s 5-in1 to pry them apart. Or clamp the face of the bead in a Vise-Grip locking sheet metal tool (Irwin, 800-464-7946, www.irwin.com) and yank it out.
Most top sashes are painted shut, but meant to be operable. Separate the paint seal with a sharp utility knife. If you’re having trouble, check for hidden screws or nails.

Fixing Jams
Remove paint from the inside running surfaces of the window frame. A Speedheater (703-476-6222, www.eco-strip.com) works well. It uses infrared light to soften paint at a lower temperature than conventional heat guns.
Remove paint from metal pulleys by soaking in a 1-to-1 mixture of Simple Green and ammonia. Rinse them with water after several days.
Check every surface of the window jambs for rot with a painter’s 5-in-1. If you find any, treat it with an epoxy repair system (System Three Resins, 800-333-5514, www.systemthree.com). Cover the empty jamb with insulating foam board or plywood.
Strip the sash down to bare wood, then sand, prime, paint and reglaze.

Glazing is key
Clean old glass. Liberally coat liquid glass cleaner over glass, and then run a safety razor over its surface before polishing with a cloth.
Use the Speedheater to soften up the glazing at the same time as the paint removal. Protect the glass from rapid heating/cooling which could make it crack. Cover it with a scrap of hardboard wrapped in aluminum foil. After exposing a 14-inch section to the heat for about 60-90 seconds, slide the unit down the rail and scrape away the loosened paint and glazing compound. Use an Eco-Strip chisel with an attached wheel to remove the glazing compound without damaging the glass.
Once the glazing is out, carefully remove the glazier’s points with a small pair of needle-nose pliers. Properly priming the sash requires you remove all the old glass panes. Work around any old glass too stubborn to remove.

If you break old glass, look for replacements at architectural salvage stores (Caravati’s, 804-232-4175, www.caravatis.com). Some manufacturers make reproductions: Bendheim (www.bendheim.com) and Artisan Glass Works (www.artisanglassworks.com)
Repair minor rot with an epoxy wood repair system. After allowing the epoxy to cure (typically overnight) lightly sand all surfaces with 100-grit sandpaper.

Apply a generous coat of Benjamin Moore’s Fresh Start-an alkyd primer suitable for both interior and exterior uses-to all surfaces except the vertical edges. Fully coat the part that holds the glass because the glazing compound will not bond well to bare wood.
After the primer dries, spread a thin frosting of glazing compound on the part that holds the glass. Gently press the glass into place. Use triangular glazier’s points to secure the glass. With a putty knife, push the points into the wood just far enough for them to be covered by the new putty. For small panes of glass (as in 6-over-6 windows) one point in the middle of each mullion will do. On larger panes, leave about 12 inches between points.
Clean the glass one last time before applying the glazing compound. Apply a coat of NoStreek Glass Polish (GetCloss, www.gel-gloss.com).
IMPORTANT: Go with a professional-grade glazing compound like Perm-E-Lastic Glazing (Atlas Putty Products, 800-373-2727, www.putty.com). Tool the compound with a curved putty knife (Ro-Don, 800-829-0687, www.ro-don.com) when working in corners.
Dust fingers with plaster of Paris to prevent fingers from sticking. Starting at a corner and holding a ball of putty in one hand, tear off thumb-sized chunks and press them roughly in place. When one side is fully loaded, place the clean knife blade in a corner an hold it at an angle steep enough to ensure that the edge of the putty won’t be visible from the other side. Using pressure from forefinger to hold the knife blade tight to the edge, draw the blade smoothly from one side to the other.
After trimming away excess putty, roll it back into the ball and move on to another section. Set aside to cure for a few days.
Put a second coat of primer on the exterior faces and follow that with a coat of paint.

Energy Efficiency
Try silicone beads and nylon pyle (brush-type) weather seals. They snap into narrow grooves routed into surfaces of the sash. Old windows may be made energy efficient by nylon pyle weather stripping on the exterior faces of the sash, where a seal will be made against the parting bead and with tubular silicone across the meeting rail and at the top and bottom of the sash. Adding storm windows is always recommended as it will protect your work.
Restringing Sashes
Make top and bottom sashes operable. You’ll appreciate the air flow. Begin by opening the covers that allow access to the weight boxes and cut the old cord from the sash weights. If the weights are missing, weigh the sash with a hand-held fishing scale, then divide by two to determine the correct replacement size.
Fish the new cord through the pulley by attaching it to a 5-ft length of string with a lead fishing weight on the end.

Loop the cord through the hole in the weight and tie it with two half-hitches, leaving a few inches of slack pointing upward. To prevent any future snags, crimp the loose end back onto the cord using a hot ring. Pull the cords as high as they’ll go and secure them with a spring clamp. Placing each sash in turn at the bottom of the jamb, cut the cord about an inch below the knot mortise in the edge of the sash and tie it in a simple overhand loop. When both sides are done, remove the clamps and operate the sash to make sure it enjoys full range of motion.
Secure each to cord to the sash with two copper roofing nails: one through the knot; the other about 2 inches above the first.
Before fastening the cords to the lower sash, temporarily remove so you can replace the box covers and the parting bead.
Secure the parting bead with 1.5 inch hardwood trim nails (Maze nails, 800-435-5949, www.mazenails.com) spaces about 24 inches apart. Cover any noticeable gap between the bead and the frame with light bead of caulk.

Replace the stops after you make sure any paint on inner edges has been removed.
Hold each one snugly against the bottom sash and tack it with the same nails used for the parting bead.
After all the stops are in place, rub a block of paraffin wax along the channels of the window frame to lubricate.
Your windows should operate as smoothly as any modern unit - and look much better.
Related pages:
Products: Custom Storm Windows
Article: Window Restoration
Article: Window Repair
Article: Old Glass
Experts: Stained Glass Repairs
Experts: Window Repair